
PROJECTS
A Taste of my Work as an Engineer
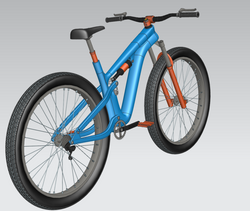
Full Suspension Mountain Bike
Personal project as well as group project for ME 4042
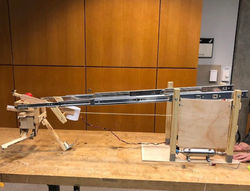
This is a a design for a full suspension mountain bike. My interest in this was started because I wanted to manufacture my own mountain bike frame but I wasn't able to find much information on mountain bike structural analysis. I assumed this was because of the complex loading conditions and companies wanted to hold this information close to themselves. So I decided this would be a fun project to do. I specifically designed the main frame, seat stays, chain stays, front fork, and rear suspension hardware. The rest of the components were designed by my teammates during a ME 4042 class. The main frame was initially analyzed by estimated the system as a truss structure. Then a FEA analysis on the main frame was conducted in NX, testing each member individually under approximated loading conditions. I have gone past the class project and run more simulations and created a fabrication plan for making the bike frame out of carbon fiber using two female molds. I hope to build this bike eventually however I've run into the two constraints that get in the way of any project, time and money.
 |  |  |  |  |
|---|---|---|---|---|
 |
AUTONOMOUS ROBOTICS PROJECT
Georgia Tech's ME2110
This is an autonomous robot constructed for Georgia Tech's notorious ME2110 class. It was a group project with various steps leading up to a final competition. Our final robot was constructed using metal slides, laser cut wood, mechatronics sensors and mechanisms, and 3D printed parts. The course was setup with four teams operating at a time, each with a zone, red, blue, black, or white. The tasks we had to complete to score points were to remove a dog bone chew toy from our zone, filter out rubber balls from diamonds that were spinning around the center to keep the diamonds and remove the balls, and finally to drop a tennis ball in the middle of the course after a random time interval when a gate would drop.
 |  |  |  |
|---|
FORD MUSTANG MODEL
This was a Ford Mustang CAD Model I created going off of 4 orthographic views of the car( Front, Side, Top, Rear). I designed it to be 3D printed using a resin printer given the detail I had. This changed my design somewhat because of constraints of the printer such as needing a hole in the underside to let the fluid flow out of the hollow interior. I really enjoyed making this model because I had the freedom to create what I want but also taught me the current limits of various 3D printers.

3D PRINTED HUMANOID
This is a couple pictures of a human figure model I designed and 3D printed for one of my classes freshmen year at Tech. I used SolidWorks to design each piece separately with pin and ball and socket joints. I had to have all the parts separate but still connected (pictures on the right) because it was 3D printed using laser sintering a nylon powder and if they weren’t, we would potentially lose parts. We only had one trial run with a single joint to see if the dimensions used would work and I was able to get it all constructed with a great fit. The final result (picture on the left) turned out fully mobile however given the nature of the laser sintering powder printing it became a little more free moving than I desired because the powder gets eroded away, it stayed in one piece however.
 |  |  |  |
|---|
R5 ROBOT END EFFECTOR
Design challenge from BMW
This strange apple looking design was part of a prototype ideation of a hack-a-thing challenge. BMW had asked for end effector for a R5 robot that could peel and stick stickers consistently to car parts. They were looking to optimize production lines. The approach I took was to create an end effector like a finger, only better. The hollow section circling the middle would be a rubbery material and the space would be filled with a gel liquid with just the right viscosity to deform but stay rigid enough to push a sticker onto any kind of surface. The middle cylinder is a pneumatic suction cup that would retract when its pressed against the car so the rubber could push it fully into place. This design allows for the sticker to be pressed evenly to most any curvature of the surface. This was a very interesting project because I got to do research on lots of different designs currently existing and went through lots of ideas to find the best possible solution. I ended up designing this in fusion because it is much more friendly to organic shapes.
 |  |  |
|---|
STEAM PLANE
ME1770 Project
Here’s a “steam plane” designed for a final project for my ME 1770 class. We were asked to come up with a creative concept/design and make it using SolidWorks. It had to be built in multiple components and it needed to be able to maneuver like the actual plane would. This was a group project where each of us had to build separate parts to all come together which meant we had to use a lot of communication. I was in charge of making the fuselage, landing gear and propeller as well as assembling the final plane.
 |  |
|---|
CAD STEAMBOAT
The Belle Louisville is a steamboat I saw in Louisville and I wanted to make a CAD model of it. So, in my spare time I built up a simple model as seen bellow and ended up trying to 3d print it. I used a resin printer because of the detail but it didn’t work out very well because of the all the thin sections. I tried different angles and supports but the size I was allowed to print on wasn’t big enough to all the parts to form fully. It was still a fun little side project that I enjoyed making.

HIGH SCHOOL SKILLS USA PROJECT
Aim Hire Chapter Display
This was a group project in high school for my schools skills USA chapter. We had to a regional and national competitions and so this year we choose to compete in chapter design. The purpose of this competition was to design a display that presented Skills USA values for this year. The years value I did were “Aim Hire,” promoting the value of skills that would be useful when trying to get hired. We created a gum ball roller coaster, where the user can maneuver the slide in the upper right corner to drop a gum ball into the middle where it then rides the roller coaster as a video plays in the background. We also constructed it so that it is easily transportable with the base being able to be flipped over and the playing area could slide in. What I like the most about this project was getting to use lots of different tools to make it. I got to weld the box frame, use our school’s woodshop to make the back board and base for the roller coaster, and 3D printers to make the roller coaster.
 |  |  |
|---|